
Understanding Ceramic Glazes: How I Learned to Master Them (And How You Can Too)
It was a regular Tuesday morning. The kiln had finally cooled below 50°C, and I opened it with anticipation. The first cup I pulled out told me everything I needed to know. Something had gone very wrong. The glaze had pulled back from the surface, leaving dry, patchy areas and tiny blisters. One more failed firing. I sat down, looked at the piece, and asked myself, “What did I miss this time?”
If you've ever felt that same frustration after opening the kiln, you're not alone. I have been there too, many times.
My name is Erik, and I’m the founder of Erra Ceramica, a ceramics studio in Milan. For over 15 years, I’ve been immersed in shaping clay, firing kilns, and, more than anything, exploring glazes. In this article, I’ll share how I moved from relying on commercial glazes to creating and mastering my own. I’ll also show you how you can start doing the same.
From Commercial Glazes to Full Creative Control
In the beginning, I used only store-bought glazes. They were easy to apply and often looked good when they worked. But I never really understood what made them behave the way they did. The compositions were vague, the results unpredictable, and I felt like I was gambling every time I opened the kiln.
Everything changed the day I bought my first electric kiln. It was 130 liters, high-temperature, firing in oxidation to cone 6. From that moment, I decided to stop using commercial glazes. I wanted full control.
The road was not smooth. For months, maybe years, I experimented. I ran test tiles. I failed repeatedly. But something shifted when I enrolled in a university-level course in glaze chemistry. That was the turning point. Understanding the chemistry behind glazes allowed me to connect the dots, identify causes behind defects, and, most importantly, replicate success.
What Is a Glaze, Really?
A glaze is not just decoration. It is a functional glass layer that fuses to the ceramic surface during firing. Its basic ingredients include:
-
Silica (SiO₂) – the core glass former
-
Fluxes – help the silica melt at workable temperatures (examples: feldspar, boron frits, calcium, lithium)
-
Alumina (Al₂O₃) – stabilizes the melt, prevents the glaze from running, and gives it structure
To these you can add colorants like copper, iron, or cobalt, and opacifiers such as zirconium or tin to modify color and surface finish.
Why You Need to Understand the Chemistry
Once you begin making your own glazes, understanding chemistry becomes essential. Each raw material contributes a specific oxide to the final formula, and those oxides behave in distinct ways at high temperatures.
But chemistry doesn’t stop at the glaze formula. The clay body matters. The firing schedule matters. The kiln atmosphere matters.
Take for example the coefficient of thermal expansion (CTE). If your glaze and clay shrink at different rates as they cool, you can end up with defects like crazing (small cracks in the glaze) or shivering (when the glaze flakes off). These problems are not just aesthetic. They compromise the strength and functionality of the piece.
In my studio, I use grogged stoneware with chamotte from 0.2 to 0.5 mm. I love it for its texture and how it interacts with microcrystalline glazes. These surfaces bring out the energy of the form and the mark-making on the clay. But not every glaze works with this clay. Some need adjustments. Others require a completely different formula. You only discover this by testing and by understanding why things behave the way they do.
The Most Common Glaze Defects and How to Fix Them
In the third session of my studio courses, we always focus on glaze issues. It’s usually the moment when students realize how complex and fascinating glazing really is. Here are the main defects I see, and what causes them:
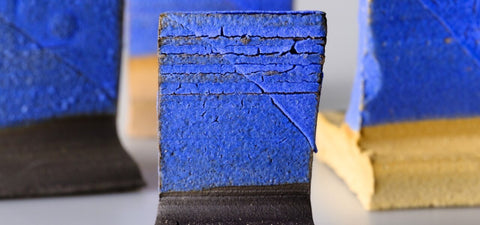
1. Crazing (fine cracks on the surface)
-
Cause: The glaze contracts more than the clay during cooling
-
Fixes: Add silica, reduce the amount of sodium or potassium fluxes, and slow down the cooling phase
2. Shivering (glaze flakes off, especially at edges)
-
Cause: The glaze contracts less than the clay and cannot stay attached
-
Fixes: Reduce silica, increase fluxes that raise the glaze’s expansion, and consider using a body with lower quartz content
3. Pinholes and blisters
-
Cause: Gases released from the clay or glaze do not escape before the surface seals
-
Fixes: Extend the soak time at peak temperature, ensure even glaze application, and use cleaner raw materials
4. Crawling (glaze pulls away, forming bare patches)
-
Cause: The glaze fails to adhere during drying or the early stages of firing
-
Fixes: Clean bisqueware thoroughly, add more clay (such as kaolin or ball clay) to the glaze recipe, and avoid excessive thickness during application
My Studio: Where Form Meets Surface
At Erra Ceramica, I’ve divided the space into two distinct areas. One room is dedicated to wheel throwing and forming. The other is used only for glaze preparation and firing. This separation is not just practical. It reflects how central glaze research has become to my practice.
I fire in electric oxidation to cone 6. My preferred glazes are those that form subtle textures and microcrystalline patterns. These glazes interact beautifully with carved and thrown surfaces, adding depth and variation instead of covering them up.
The Advice I Would Give My Younger Self (and What I Tell My Students)
If I could go back 15 years and give myself one piece of advice, it would be this: test everything and learn the chemistry behind your materials.
Early on, I thought ceramics was all about intuition and form. I treated glaze like a decorative coat, something I could figure out by trial and error. And so I made mistake after mistake. The worst part was not knowing why something had failed.
Today, I teach my students to approach glaze as an essential part of the creative process. I encourage them to make test tiles for every new glaze. But more importantly, I show them how to record each detail: raw materials, firing curve, thickness, clay body, and kiln atmosphere.
Understanding glaze chemistry does not limit your creativity. It multiplies it. Once you know how each oxide behaves, you can start making informed choices. And when something goes wrong, you will know exactly how to fix it.
Knowledge gives freedom. Control gives consistency. Together, they open the door to everything else.
Safety First: Always Respect the Materials
Working with raw glaze materials requires care. Some ingredients can be harmful if inhaled or handled improperly. Always wear a well-fitted respirator, use gloves when mixing, and ensure your workspace is properly ventilated. Read the safety data sheets for each material and do not take shortcuts when it comes to health.
Conclusion: From Confusion to Confidence
Today, when I open the kiln, I usually know what to expect. And when the result is not what I hoped for, I no longer panic. I return to the glaze formula, check my notes, and adjust with intention.
The journey from confusion to confidence takes time. But it is absolutely worth it. Mastering glazes is not just about preventing problems. It is about unlocking your full creative potential.
If you're walking that path right now, keep going. Keep testing. Keep learning. The kiln will teach you, but only if you ask the right questions.
I’ll be doing the same — in my studio here in Milan.
Erik
Erra Ceramica, Milano